PowerPivot for Excel is a fantastic addition to Microsoft’s Business Intelligence offering. It provides a self-service capability for users to mash-up huge amounts of data from multiple sources, create advanced calculations that get refreshed alongside their pivot tables and the ability to very easily publish workbooks as web applications. Excel users are already comfortable with the interface. And the PowerPivot add-in is free for Excel 2010 and 2013 users.
There are pros and cons to using any one of PowerPivot for Excel, PowerPivot for SharePoint, SSAS Tabular or SSAS multidimensional. Melissa Coates has written a great article on when to use which type of model. While PowerPivot for Excel is a fairly robust and flexible tool for individual users, there are many reasons why you might promote an Excel Tabular model to SQL Server Analysis Services.
PowerPivot for Excel can be a great starting point for users to decide what information they want to include in a model. It allows them to play with the data and refine the model until it houses the main information that they need to see on a regular basis, in a format they can easily consume. What can happen is that the workbooks get emailed around and get out of synch between users. Or the data gets too large and the model takes forever to refresh. Or the in-memory calculations take too long to load.
When this happens you might want to promote your Excel Tabular model to SSAS, if your infrastructure supports it. It means the flexibility for users to mash-up additional data is lost, but the gains in stability, scalability, security and other features can be well worth the move. Microsoft has made this promotion of a model very easy to do.
1. Create a new SSAS Project
Open up SQL Server Data Tools. In the File menu click New and then Project. In the New Project dialog box, under Installed Templates expand Business Intelligence and select Analysis Services. On the right select Import from PowerPivot.
Browse for a location and enter a name for your project, and then click OK.
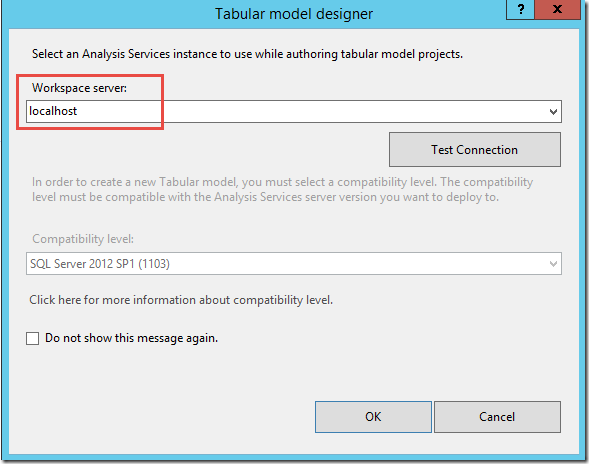
In the Tabular model designer dialog you can enter the SSAS instance you will use for model. It will need to be an SSAS instance running in Tabular mode.
In the Open dialog box select the PowerPivot model for Excel that you will be converting to SSAS.
It will take a minute or two to load the model into the project.
2. Check and refine your model
In the solution explorer, double click on the Model.bim top open up the imported model.
You will see the tabs similar to the PowerPivot model near the bottom of the screen, and any warnings, errors or messages.
Here you can do any edits to your model. The interface is very similar to PowerPivot. You can delete, hide or show data tabs from Client Tools by right clicking on the tab.
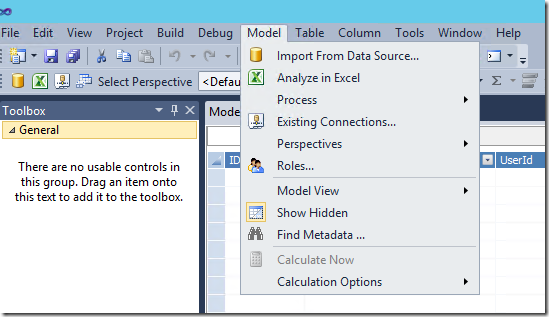
You can manage the model from the Model menu.
You can edit the table properties and manage the relationships from the Table menu.
You can add, edit and manage calculations and columns within the table tab.
3. Deploy the Model to Analysis Services
From the Build menu, you can build and deploy your model. You can troubleshoot any deployment issues by following the error messages that pop up in the Deployment dialog in the Message column.
4. Connect to your SSAS Tabular Model
You can connect to the model through Excel or SSMS or any other client tool that can consume an SSAS model. In Excel, you won’t be using PowerPivot, rather you will be using the SSAS Tabular model as a direct data source.
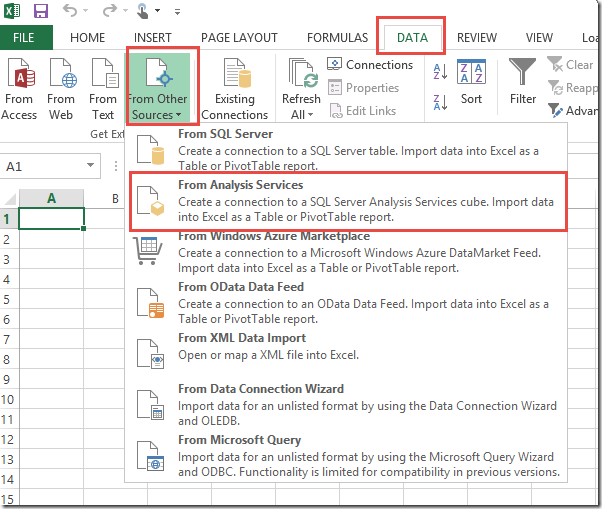
In Excel, click on the Data tab, click on From Other Sources and then From Analysis Services.
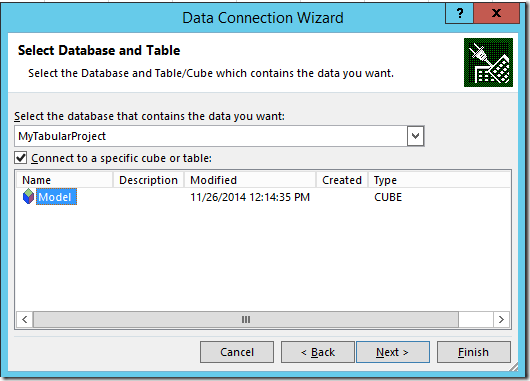
Enter the server name where you deployed your model, then select the database and model that you deployed.
You can now use this as a classic Pivot Table data source.
I’ve noticed that the Tabular model is not as robust or responsive as the multi-dimensional model when you get to larger sets of data. This is because it does everything in memory. The converse of this is also true for smaller sets. Because it is in-memory it can retrieve information and do calculations more quickly for smaller data sets. Multi-dimensional models have additional features that Tabular does not have. Richard Lees did an interesting comparison of Tabular vs Multidimensional.
As mentioned at the beginning of this article, the flexibility of PowerPivot can be exchanged in favour of the stability and scalability of a traditional SSAS deployed model. Having users develop their own tabular models in PowerPivot and then have I.T. manage and deploy it to a wider audience allows for a great partnership and a quick development cycle.

