Report Manager Subscription Last Day of Month

I have a client who wants to create report subscriptions which run on the last day of each month.  I am surprised to discover that this doesn’t come out-of-the-box with Report Manager. 

The subscription schedule allows a number of options by hour, day, week, month.  The Monthly Schedule option allows for Last week of month, but the user then has to choose the day of the week or calendar day.  And when I insert 31 as the calendar day it gives an error message, presumably because some months do not have a 31st day.  There is no option for last day of month. 

image

Here is one workarounds to this:  One option would be to run the subscription on the first day of the month, defaulting the report to the previous month.  For this to be an option you would need :  1. A data parameter in the report and 2a. The report already defaults to the previous  month or 2b. An edition of SQL server which supports data driven subscriptions in order to override the default parameter to last month.  This is not an option for my client.

The solution that worked was a little different.  You need access to be able to create a Shared Schedule on the Report Manager site, and access to the ReportServer database and SQL Server Agent on the report server. What you will do is create a Shared Schedule, which in turn creates a SQL Server Agent job.  And then you will edit that job in SSMS to run on the last day of the month.  Any report subscriptions can then use that Shared Schedule to run on the last day of the month.  You could do something similar for each individual subscription, but why would you, when you can do it only once in a Shared Schedule.

Here are the steps:

1. Create a Shared Schedule in Report Manager

In Report Manager, go to Site Settings and select Schedules.  You will need the right permissions to be able to access this.    Click on New Schedule.  Create a schedule.  It doesn’t really matter what you set it to, since you will be changing it on the back end.  Note that the front end Schedules list will reflect the changes that you make to the back end, but if you try to edit the schedule your original values will still be there.  Give the schedule a descriptive name  to identify it.  I called it "Last Day of Month". 

2. Find out the ScheduleID of the Shared Schedule you have created

Run this query in the ReportServer database to find out the ScheduleID.

SELECT ScheduleID FROM Schedule WHERE Name = 'Last Day of Month' 
image


3. Find the SQL Server Agent Job for that ScheduleID

In SSMS navigate to SQL Server Agent and find the corresponding job.

image

4. Edit the properties of that job to run on the last day of the month

Make sure the schedule is Enabled.

image


The Shared Schedule will reflect Last Run and Next Run values correctly in the Schedules pane.  Note that the details of the schedule will NOT reflect this, since it is not an available option in the Report Manager interface.

Now a user can choose this schedule when setting up a subscription. 

I found this blog by Andreas Halleraker really helpful in finding a good solution. 

How to use a Delimited String in a Multi-valued Parameter

I’ve seen this issue a lot lately.  There is a need to feed a comma delimited string of values into a multi-value parameter in an SSRS report.  There is a simple way to do this.

SET UP YOUR MAIN REPORT QUERY

Your main report query should be set up to expect a string of values in the parameter. For example:

SELECT Product_ID
      ,Item_No
      ,Item_Description
  FROM DIM_Product
  WHERE Item_No IN (@ITEM)
SET UP THE PARAMETER

The parameter should be set up as text, but NOT allow multiple values.

image

You can set this up as you wish to meet your purpose, but for demonstration I will set up two groups of comma delimited strings as available values.

image

I have set up a second data set to feed these default values to the parameter.

SELECT '11000B,2200,17000' AS ITEMNMBR
SET UP THE PARAMETER ON THE MAIN REPORT DATASET

Now comes the magic.  On the Dataset Properties for your main report dataset, on the Parameters tab, edit the expression for the Parameter Value.

image

Write this in the parameter expression:  =split(Parameters!Item.Value,",")

image

This will take the comma delimited string as input, split it into individual values and it will get used in the IN clause of the main query that we set up at the beginning of this post.

WHERE Item_No IN (@ITEM)

Viola, the report filters on a string of values.

image

SSRS “Continued” Group Header on Subsequent Pages

Here’s an easy way to alter your group header on subsequent pages in SSRS, without using any custom code.

Step 1:  Add a row number by your grouping to the data set query
SELECT     
ROW_NUMBER() OVER(PARTITION BY Layout_Code ORDER BY Product_ID) AS Row
,[Layout_Code]
,[Product_ID]
,[Variant_Code]
  FROM[DIM_Product]
Step 2: Be sure your Row Group header is set to Repeat on New Page

Do this by selecting the small triangle at the top right of the grouping pane and turning on Advanced Mode.  Then select the Static member at the top of your group and set the RepeatOnNewPage property to True.

image

image

Step 3: Add the Row field in your report

Add the =First(Fields!Row.Value) field into the group header row of your report.  Call the textbox RowGroup.

Add the Row field into the detail row of your report. Call the text box RowDetail.

These fields will be hidden later.

image

Step 4: Add the Group Header expression

Set the Group Header expression like this:

=iif(ReportItems!RowGroup.Value=ReportItems!RowDetail.Value, Fields!Layout_Code.Value, Fields!Layout_Code.Value + ” Continued”)

Notice in the preview of the report that on the first page of the report the RowGroup textbox = 1 and the RowDetal textbox = 1.  The Iif statement dictates that the group header shows the Layout_Code value.

image

On page 2 of the report, since the Layout group continues and 1 <> 49, the work “Continued” is added to the group header.

image

This will carry on until a new group starts and the row number goes back to 1.  You can go ahead and resize and hide the column once you have the logic working.

Activating SSRS Report Content Types for SharePoint

For information on how to set up a report library and the relevant content types in SharePoint see this previous post – Create A Sharepoint SSRS Report Library

I recently had trouble publishing an SSRS report to SharePoint.  I was unable to find the Report Server content types on the library.  I needed to activate the Report Server Integration Feature in order to be able to add the SSRS content types to the library.  Here is how to do that.

Go to Site Settings

image

Under Site Collection Administration, choose Site collection features

image

Beside Report Server Integration Feature click the Activate button.

image

That’s it, you’re done. Now you will find the Report Server content types listed in the Site Content Types

Manually Deploy SSRS Reports to SharePoint

I have a situation where there is an alternate authentication method in place on SharePoint and deploying reports using the Visual Studio deployment options won’t work.  To get around this while they sort it out I have manually loaded the reports, data sources and shared datasets to SharePoint.  There were a few tricks which I would like to remember so I’ll post them here.

1. Create 3 document libraries:

The first thing I did was create three libraries, one for Reports, one for Shared Datasets and one for Shared Data Sources.  You don’t have to have separate libraries, but I find it more user friendly to keep these items separate.  I don’t want users weeding through data sets and data sources to get to their reports.  Here is how to create these libraries.  The one surprise is to use a content type of Report Builder Report for the Shared Datasets.  I imagine this is to allow you to configure your Dataset to connect to a Data Source.

2. Create (don’t upload) the Data Source.

Navigate to the Data Source library you created. From the Documents tab select New Document.  Do not try to upload a data source you have already created for your report, since, for whatever reason, SharePoint won’t recognize it as a Report Data Source. You need to recreate it.  

image

Configure the data source appropriately. Choose “Stored Credentials” to allow for proxy authentication, and select “Use as Windows credentials”.  Click on the Test Connection button to be sure it is working.  Click OK.

image

3. Upload the Shared Datasets:

Navigate to your Shared Datasets library and from the Documents tab you can “Upload Document” or  “Upload Multiple Documents” depending on how many shared datasets you have. 

image

4. Connect the Shared Datasets to the Data Source:

Connect the shared datasets to the appropriate data source.  Click the drop down beside the dataset and select “Manage Data Sources”.

image

Click on the “DataSetDataSource”, which will have the yellow caution triangle to let you know it has not been configured.

image

Click on the ellipsis and navigate to wherever you created the data source in SharePoint. 

image

Click OK and click Close.  Do this for all the Shared Datasets you uploaded.

5. Upload the Report:

Navigate to the Report library you created.  From the Documents tab select Upload Document and upload your Report Services report.

6. Connect the Report to the Data Source:

From the drop down beside the report select “Manage Data Sources”.

image

Same as step 4, click on the name of the data source that needs to be connected.  Click on the ellipsis and navigate to where the data source is stored in SharePoint.  Click OK. Click Close.

7. Connect the Report to the Shared Datasets:

From the drop down beside the report select “Manage Shared Datasets”

image

From the list of dataset names which need to connected, click on the first one which has a yellow caution triangle beside it.  This lets you know that the dataset has not yet been connected. 

image

Click on the ellipsis and navigate to where you have stored your shared datasets.  Select the dataset.  Click OK. Repeat this for any shared datasets which have not been connected.  Click Close.

You are ready to view your report.  If you get any data source errors, check that the Shared Datasets are all connected correctly to the data source, as well as the report.

Create a SharePoint SSRS Report Library

For whatever reason this type of library is not out-of-the-box.  I have to set it up manually every time.  Here are the steps for this particular client.  They will be similar for other SharePoint/SSRS set ups.  You can follow these instructions to set up an SSRS Data Source library and an SSRS Share DataSet library.

Document type                        Content Type

Report Services Report       Report Builder Report

Data Source                              Report Data Source

Shared DataSet                       Report Builder Report

1. Create a Document Library in SharePoint.

Go to Libraries.  Click Create.  Call your new library “Reports”.

image

2. Allow Management of Content Types.

Click on your library. Go to Library Settings. Click on Advanced Settings.  Change the radio button for “Allow management of content types” to Yes.  Click OK.

3. Add Report Content type.

In the Library Setting under Content Types click on “Add from existing site content types”.  In this case the client is using Report Builder content types for reporting, which will work fine for Report Services reports.


image

From the “Select site content types from” drop down, select “Report Server Content Types”.  Add any content types you would like to maintain in your Reports library.  I prefer to keep data sources and data sets in separate libraries, but some people like to keep them on one library.  Take note that whichever content type floats to the top of your Content Type list will be the Default content type for your library.  This will matter when creating and adding new documents.  Add the default Content Type first, and then any others.  Click OK.

If you don’t see the Report Server Content Types listed in the drop down, you may need to activate them on your Site Collection.  Read this post to find out how to do that – http://thedataqueenblog.azurewebsites.net/2013/05/activating-ssrs-report-content-types-for-sharepoint/

image


4. Delete the Document Content Type.

Under Content Types select the “Document” content type.

image

Select “Delete this content type”.

image

This will make the Report Builder Report content type the default content type.

You are ready to deploy SSRS reports to your SharePoint library.

If you find that you are unable to deploy your reports using the deploy feature in Visual Studio – for example Visual Studio keeps asking you for credentials when you try to deploy – you may want to manually upload the reports and data sources to SharePoint.  Read this post to find out how http://thedataqueenblog.azurewebsites.net/2012/07/manually-deploy-ssrs-reports-to-sharepoint/

Data-Driven Subscription Fails but Report Runs Manually

In a continuation of my last blog post on Finding Report Subscription Errors, there was a tricky little reason why the subscription was failing for some of the parameter values, even though the reports could all be run manually.  Just like the Current User Filter in SharePoint, it is CASE SENSITIVE.

I got this error in the trace log:

library!WindowsService_113!308!05/29/2012-10:31:17:: e ERROR: Throwing Microsoft.ReportingServices.Diagnostics.Utilities.InvalidReportParameterException: , Microsoft.ReportingServices.Diagnostics.Utilities.InvalidReportParameterException: Default value or value provided for the report parameter ‘Manager’ is not a valid value.;

But all of the values being fed to my subscription were valid values which worked when manually running the report.  Why did some of the reports in the subscription render successfully and others not?  It turns out the underlying query in SSRS for the Manager parameter dropdown had a mix of either lowercase or the first two letters capitalized. The query I was using in my data-driven subscription was all lowercase.  So only those in the report dropdown which were lowercase were running successfully. 

I solved the problem by changing the underlying query feeding the SSRS Report Parameter to lowercase, and ensuring that my subscription query was also lowercase.  This resolved all the errors.

Finding Report Subscription Errors

I had an issue trying to find what was causing a data-driven report subscription error.  The SSRS report is deployed to SharePoint, and Reporting Services is in SharePoint Integrated mode. The subscription was showing last results as “Done: 15 processed of 15 total; 7 errors.” It took awhile to find the pieces I needed to figure out what was causing the error.

I found some information about looking at Report History in SharePoint and creating a New Snapshot, which would give me the last known error.  However, since some of the reports had run successfully this did not work. 

Next I tried looking at the Report Server database in the ExecutionLog tables.  I isolated the query results to just the one report subscription by writing a query like this:

Use ReportServer
select * from ExecutionLog3
where  RequestType = ‘Subscription’ AND timeStart >’2012-05-29 11:30:00.000′
ORDER BY TimeStart DESC

This only returned the successes, not the failures.

Finally, I tried looking in the Report Server Trace Log file.  There was very little in the log file and nothing to do with my subscription.  I knew that the Trace Log file should hold the information I needed.  After much poking around I realized that I had made a fundamental error in my assumption about the architecture. The Trace Log file resides on the SharePoint server, not the Report Services database server. 
Find the Trace Log

The Trace log files can be found on the SharePoint server, usually here:  C:Microsoft SQL ServerMSRS10_50.MSSQLSERVERReporting ServicesLogFiles

Find the ScheduleID for your Subscription

Find the Schedule ID of the most recent subscription by querying the ReportServer database:

select
‘SubnDesc’ = s.Description,
‘SubnOwner’ = us.UserName,
‘LastStatus’ = s.LastStatus,
‘LastRun’ = s.LastRunTime,
‘ReportPath’ = c.Path,
‘ReportModifiedBy’ = uc.UserName,
‘ScheduleId’ = rs.ScheduleId,
‘SubscriptionId’ = s.SubscriptionID
from ReportServer.dbo.Subscriptions s
join ReportServer.dbo.Catalog c on c.ItemID = s.Report_OID
join ReportServer.dbo.ReportSchedule rs on rs.SubscriptionID = s.SubscriptionID
join ReportServer.dbo.Users uc on uc.UserID = c.ModifiedByID
join ReportServer.dbo.Users us on us.UserID = s.OwnerId

Search for the ScheduleID in your Trace Log and find the Error message

Open the appropriate log file based on the time stamp being the most recent after the subscription ran, and search for the ScheduleID.  Once you find the first entry for your ScheduleID, look for anything that starts with e ERROR

The error message can look like this:

library!WindowsService_113!308!05/29/2012-10:31:17:: e ERROR: Throwing Microsoft.ReportingServices.Diagnostics.Utilities.InvalidReportParameterException: , Microsoft.ReportingServices.Diagnostics.Utilities.InvalidReportParameterException: Default value or value provided for the report parameter ‘Manager’ is not a valid value.;

Credits

In preparing this post, I found the following articles to be useful:

http://blogs.msdn.com/b/deanka/archive/2010/02/16/troubleshooting-subscriptions-part-ii-using-the-report-services-trace-log-file.aspx

How to Use a Current User Filter to filter an SSRS Report Web part in SharePoint (using a list of Available Values)

It is not an uncommon requirement to be able to publish an SSRS report to SharePoint and then use it in a Web part filtered by the user viewing it.  You include the domainuserid in your main report query and filter the query on this value using a report parameter where the user value can by typed in.

However, in many cases the report does double duty as a report stored in a Report library, where users could choose multiple or ALL users.  In that case you want to have a list of Available Values in your parameter so that someone viewing the report in the library can pick from a list of users rather than have to know everyone’s user id.  The tricky part is formatting the domainuserid in your parameter so SharePoint can use it, and adding yourself to the list of available values so you can test that the Web part works as expected.

These are easy to do, but it took me a little bit of time to figure it out, so I’m blogging it here.

CREATE THE LIST OF AVAILABLE VALUES FOR YOUR PARAMETER

The SharePoint Current User Filter expects the domainuserid in the parameter list of available values to be all lowercase.  So when creating the SQL Query for  need to convert them to lower case.  You also want to add yourself to the list for testing purposes, otherwise you will get an error when looking at the Web part in SharePoint.  You can do this using a UNION clause.  Your query for the list of available values should look like this:

SELECT DISTINCT
‘mydomain’ + LOWER(myuserid) AS UserAccount,
myUserName as UserName
FROM myTable

UNION
SELECT
‘ ALL’ AS UserAccount,
‘ ALL’ AS UserName

UNION
SELECT
‘mydomainmydevuserid’ AS UserAccount,
‘mydevusername’ AS UserName

I won’t go into the details here of how to use ALL in your report, but you can read more here http://thedataqueenblog.azurewebsites.net/2011/06/how-to-default-to-all-in-an-ssrs-multi-select-parameter/

Configure your user parameter as follows:

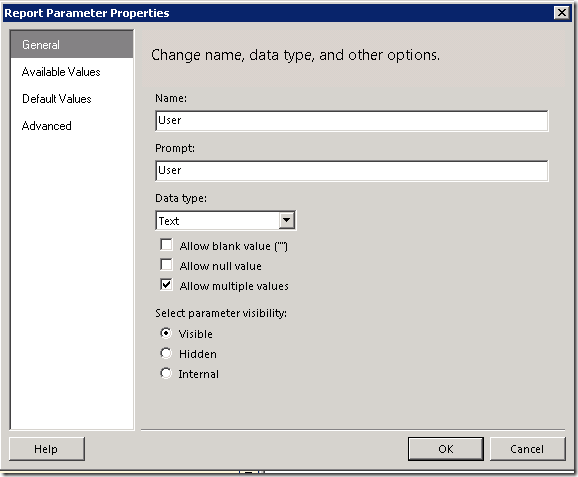
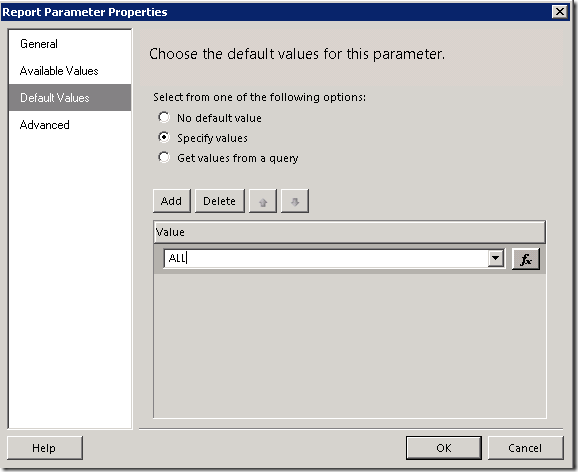
image

image

image

Publish your report to the relevant SharePoint library, and navigate to the library and test that the report and the parameter is working as expected.

ADD THE REPORT TO A WEB PART

Add the report to a web part as you normally would.  You would add a web page, and configure a web part to be a SQL Server Reporting Services Report Viewer.  Edit the web part and navigate to the report you created.  Open the Parameters section and click on the Load Parameters button.  You can leave the parameter default as “Use Report Default Value”.  Click Apply and OK.

ADD THE CURRENT USER FILTER TO A WEB PART

Add a web part and choose the Current User Filter type from the Filters section.  It will say that it is not connected.

CONNECT THE FILTER TO THE SSRS REPORT VIEWER

Go back to your Report Viewer web part and from the drop down choose Connections –> Get Report Parameters From –> Current User Filter

image

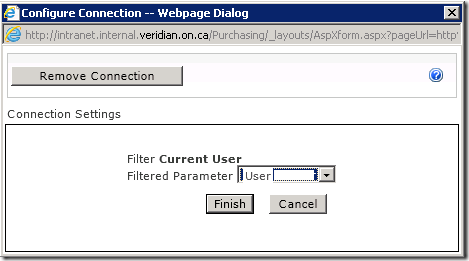
A dialog box will pop up where you can choose your User parameter and click on Finish.

image

Check in your changes and view the results.  You will be able to see your web page with the report filtered on your user name.  As a developer, if you do not have any values in this report you should see the report with no values returned, rather than getting an error.  This is because you added your userid to the list of available values at the beginning of this exercise.  You might want to remove yourself from the list once you have tested that the web part is working correctly.

Filter a Parameter with Long List of Values Using Type Ahead

I have a customer who has huge numbers of SKUs. Their reporting is using an SSAS cube as the data source. When filtering an SSRS report the users have to scroll through many many records to get to the SKU they want.   There is a type-ahead feature built into SSRS but you have to type superfast and hit it exactly in order to make it work.  I came across this great solution, and would like to blog the step-by-step with a cube as datasource. 

The solution is basically to add an additional text parameter which will prefilter the available values in the large parameter list.  This way the user doesn’t have to scroll through the long list to find the item they want, but can produce a shorter picklist, or even reduce the list down to one value if they type the exact SKU in.  They still have to check the box on the item they want, even if they’ve typed it all in, but it is still a good option when dealing with huge lists.

1. Alter your existing Available Values query to include the new pre-filter parameter.

When you created the original parameter in the report BIDS automatically created the dataset for the Available Values in the parameter.

image

You need to alter this query to use an additional pre-filter text based parameter.

1. Show hidden datasets.  Right click on your data source and select Show Hidden Datasets

image

2. Find out which dataset is being used by your parameter in the Available Values.  Right click on the parameter and select Parameter Properties.  Select the Available Values tab and find the name of the query being used.

image

3. Open up the dataset query.  Right click on the dataset you just identified, and select Query.

image

4. Add a parameter to the query.Click on the parameter button in Query Designer.

image

Type in the name of the new Parameter you would like to add for the type-ahead prefilter, and put in a Default value.  Don’t worry, you can change the default value in your Parameter Properties later if you wish.

image

Select OK.

5. Add the highlighted additional line of MDX to your query. Place the line right before the very last FROM [nameofcube], and add a close bracket at the end of the query.  This MDX will further filter your available values based on what is typed into the prefilter you are creating.

WITH MEMBER [Measures].[ParameterCaption] AS [Product].[Style Code].CURRENTMEMBER.MEMBER_CAPTION MEMBER [Measures].[ParameterValue]
AS [Product].[Style Code].CURRENTMEMBER.UNIQUENAME MEMBER [Measures].[ParameterLevel] AS [Product].[Style Code].CURRENTMEMBER.LEVEL.ORDINAL
SELECT {[Measures].[ParameterCaption], [Measures].[ParameterValue], [Measures].[ParameterLevel]} ON COLUMNS , [Product].[Style Code].ALLMEMBERS ON ROWS
FROM ( SELECT ( STRTOSET(@ProductDivisionCode, CONSTRAINED) ) ON COLUMNS
FROM ( SELECT (IIF(LEN(@ProductStyleCode_filter) =0, ([[Product].[Style Code].ALLMEMBERS), (FILTER([Product].[Style Code].ALLMEMBERS, INSTR ([Product].[Style Code].CURRENTMEMBER.MEMBER_CAPTION , @ProductStyleCode_filter) > 0)))) ON COLUMNS
FROM [Sales and Inventory])     )  

Click OK to save your Query.

BIDS has created your new paramater for you.  Now you can edit the default value of your parameter if you like, and then test your report. All should be working as expected.

Thanks to Thomas Puch and Ella Maschiach for their blogs on the subject.